Producing great content at scale can be a daunting task. Whether it’s for your own company to expedite your SEO (search engine optimization) results for the next year or for a client who’s pressing you to get it done (or else you lose the contract), content is rarely good if produced at scale and rarely at scale if it’s good.
So how do you give yourself the best chance of reaching your goal and doing work that you are proud of?
Lucky for you, we’ve seen nearly a thousand documents at EditorNinja over the last year alone, and from that, we’ve seen what works and what doesn’t work for producing content at scale.
Today we’re sharing the steps we’ve seen so that you can repeat them to see success yourself. A few steps are counterintuitive, and you may be tempted to skip the first one, but I encourage you to take each and every step as it comes — so you don’t fall on your face, overwhelmed with content that doesn’t get you the results you want.
Step 1: Determine the Goal
Before you start planning and producing content, you first need to determine the goal and if producing a lot of content will even get you to that goal.
The goal itself doesn’t really matter, in that no goal is necessarily better or worse than another on its own. You simply need to understand your goal for the content, so you don’t waste a lot of time and money.
Your goal could be something like:
- Produce a lot of content now to drive a lot more organic traffic and leads next year
- Use leftover end-of-year budget so that it’s not lost next year, and results can come later
- Test content production quickly to make sure all of the processes are working well — before investing a lot more budget in producing content next year
Producing a lot of individual blog posts to drive SEO traffic makes a lot of sense and should accomplish that goal, given the content is done right.
Producing a lot of blog posts with the goal of enabling sales to overcome objections may be effective, but is less likely to be so. Your focus may be better spent on producing messaging documents and scripts for them to follow instead.
Regardless of your goal, picking the right strategy to achieve that goal is paramount to success.
Step 2: Outline the People Needed
Producing content consistently over time is pretty easy. You have a process for ideating, creating briefs, assigning writers and editors, and a publishing schedule.
Producing significant quantities of content quickly is a completely different game.
Most freelance writers only have a certain amount of available time for each client. Most editors are similar in that they have multiple clients at a time and only a certain number of hours per month they can effectively work for each client.
PS — EditorNinja doesn’t have this problem. We can scale up and down with the simple click of a button. Learn more.
Because of these very real limitations, you will need more people at once, for a shorter amount of time, than if you’re creating consistent content over time.
You’ll need more people to create briefs, or more time carved out of your schedule to create more briefs than you are used to.
You’ll need more writers.
You’ll need more editors.
You’ll need more project management because when content is coming back en masse and at speed, it’s more important than ever to keep everything organized.
Step 3: Procure an Appropriate Budget
Once you’ve picked the strategy that you think will help you reach your goals, you need to procure the appropriate budget.
I cannot tell you the number of times I’ve spoken with a company that wants to produce a lot of content, but they’ve only budgeted for a fraction of it.
Budgeting for content at scale is very different from budgeting for a “content marketing engagement” over a longer period.
Why? Consider all of these changes:
- The number of briefs that need to be created
- The number of writers needed to produce all of the content on time
- The number of editors needed to ensure the content is ready to go
- The timeline to produce has shortened, which often means higher costs for all of the above
Along with these four points, you also have to have the cash up front to pay for all of it. It’s easy to say that you’ll spend $5k a month on content over twelve months to get to $60k. It’s a lot harder to have $60k cash on hand (or on a credit card balance!) to spend on content NOW, and many companies are quite simply unwilling to make that investment — even when they know that content is and will continue to be a large driver of business for them in the future.
As the content manager or content lead, you’ll need to change your own mindset around how a lot of great content is produced fast, and you’ll need to help your boss, clients, or other key stakeholders make that shift as well.
Step 4: Plan and Prioritize
Now that you’ve determined your goals, outlined (and hired!) the people needed, and procured the budget to get it all done, you need to plan and prioritize your content according to potential for success and business metrics..
First, planning involves:
- What the topic will be
- The brief
- Who the writer will be
- Who the editor will be
- When the first draft is due back
- When the final draft is needed
As you’re creating the topics, make sure that you’re prioritizing the most important content to be created first.
Oftentimes we end up falling a bit short of big goals, so by moving the most important content to the front of the line you’ll more than likely end up producing the highest-impact stuff and anything not produced will be low-impact.
The plan can be as basic as this spreadsheet:
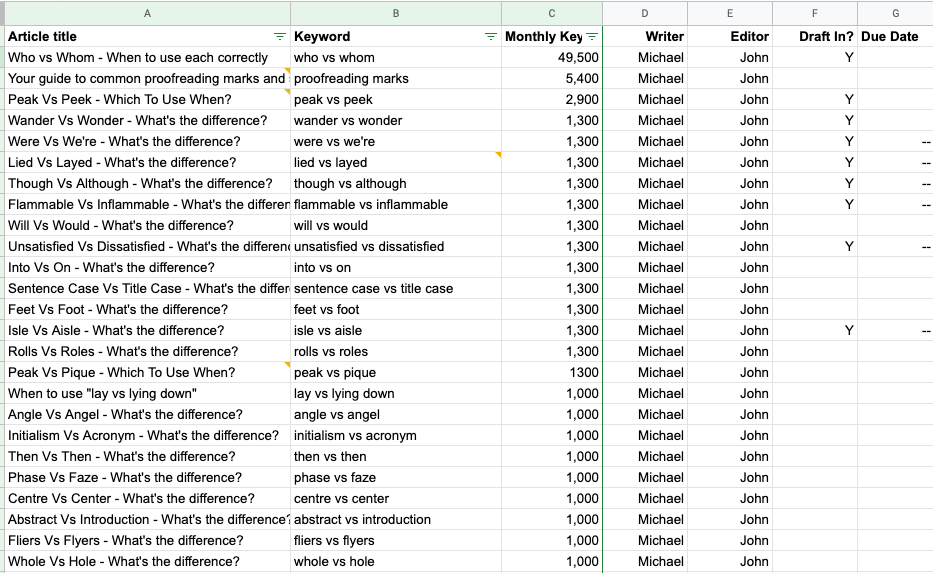
The content plan for the EditorNinja blog. The plan includes information like the topic, writer, and editor, and is organized by search ranking, prioritizing higher-ranking topics.
Of course, the more in-depth you can go the better.
Step 5: Create Briefs
Next up is creating your content briefs.
I’m going to talk through the steps to creating a brief and what to include, then point out a few tools that you can use to expedite brief creation.
What Is a Content Brief?
A content brief is a document that outlines the requirements for the piece, guiding the writer to create content that meets the end goal.
Simply put, it’s the document that contains the outline and important information. Every document created by an outsourced provider should be provided a brief by you, the customer, that the they, the writer, can follow.
What Does a Content Brief Include?
A brief can include any or all of the following:
- Audience
- Primary keyword or topic to cover
- Suggested title (H1)
- Suggested headings (H2/H3/etc)
- Word count
- Link to a style guide
For a longer, more complete take on a content brief, check out Content Harmony’s guide to content briefs.
Tools to Create Content Briefs
You’ll find a few tools on the market that specialize in helping you create good content briefs, and some of them do well at scale.
Content Harmony is a former content marketing agency turned SaaS (software as a service) company that has turned their agency’s brief process into a tool that you can use to create briefs for your own content.
SurferSEO, Frase, and Clearscope (in order from least to most expensive) are all AI-powered content marketing tools that have brief-creation capabilities, helping you create briefs that are optimized for SEO rankings specifically.
Step 6: Load Everything into a Project Management Tool
Now that you’re ready to begin production, it’s time to load everything into a central place where you can track the progress of everything toward your goals.
Let me be very clear about something:
The tool does not matter. Using the tool effectively matters. Actually using it to manage the process makes the difference between success and failure.
I’ve seen teams effectively use Google Sheets to manage hundreds of pieces of content being produced.
I’ve seen teams use very expensive content management tools effectively.
I’ve also seen teams use (or not use, more aptly) both of the above ineffectively, wasting a lot of time and money, and never reaching their goals.
At a minimum, your project management tool should have the ability to:
- Outline the document title
- Attach a brief and style guide
- Assign the writer
- Assign the editor
- Update statuses
Step 7: Assign Writers with Due Dates
Now that you have your content list prioritized and briefs created, it’s time to assign writers and give them due dates.
This step is pretty simple, but keeping writers on task becomes challenging.
My best advice for working with writers and getting them to get content back on time is not to nag them, but rather to:
- Assign the document
- Track if it is returned early, on time, or late
- Determine from there if the writer should be retained
The three points above are exactly why, within EditorNinja’s editing workflow software, documents are assigned an editor, a start date, and a date that it is due back to the customer. We also have a review queue to make sure that documents are returned on time.

EditorNinja’s editing workflow software clearly assigns documents and tracks due dates.
Step 8: Have Editors Ready to Go
Along with finding writers, you need editors who are standing by ready to edit content as it comes back.
Finding good editors can be just as hard as finding good writers, so if you have good editors already on board, then hang on to them with everything you have.
If you don’t have good editors, then these are the steps to follow to find and test them:
- Post the gig, including pay and expectations, on one of the better-known freelancer platforms like Upwork or Freelancer.
- Get a lot of responses, review them all, and respond to the ones that seem good.
- Test out each editor, give them feedback, cull the bad, and keep the good.
Of course, if you want to skip all of the above and get everything edited by fast, high-quality editors, use EditorNinja. It’s quick to get started, and we’re happy to discuss your needs with you if you have more questions before getting started.
Step 9: Review and Organize
Now that your production process is in motion with writers writing and editors editing, your main job will shift to managing the flow, reviewing work that comes back, and organizing it for publishing or sending to your client.
The most common places to organize content that’s ready to go are:
- In cloud storage, such as Google Drive or Dropbox, with folders
- In the project management tool
Step 10: Publish (or Send to Clients)
Now that you have completed the documents, the final step is to publish them or send them to your clients for publishing.
If you’re an agency and want to go next-level for your clients (and charge them for it!), you can also get access to their CMS and take care of the uploading and formatting for them. You can also negotiate with the client if they want a final review before it is published or if you can publish on their behalf.
Need Content Editing at Scale?
We can’t help you with finding writers and creating your briefs, but once your documents have been produced and are ready for editing, our editors can take the hand-off and make your content sing.
Get started today, or schedule a free editorial assessment to learn more about EditorNinja and our unique unlimited content editing services.